【Tomcat】三.Tomcat启动(上)

上一篇的时序图:

一. StandardRoot启动

1
2
3
4
5
6
7
8
9
10
11
12
13
14
15
16
17
18
19
20
21
22
23
24
25
26
27
28
29
30
31
32
33
34
public class StandardRoot extends LifecycleMBeanBase implements WebResourceRoot {

@Override
protected void startInternal() throws LifecycleException {
mainResources.clear();

// 根据类型,创建对应的资源包实例
main = createMainResourceSet();

mainResources.add(main);

// 一次启动此类指定的资源
for (List<WebResourceSet> list : allResources) {
// Skip class resources since they are started below
if (list != classResources) {
for (WebResourceSet webResourceSet : list) {
webResourceSet.start();
}
}
}

// 扫描lib下的所有jar包
processWebInfLib();
// Need to start the newly found resources
for (WebResourceSet classResource : classResources) {
classResource.start();
}

cache.enforceObjectMaxSizeLimit();

setState(LifecycleState.STARTING);
}

}

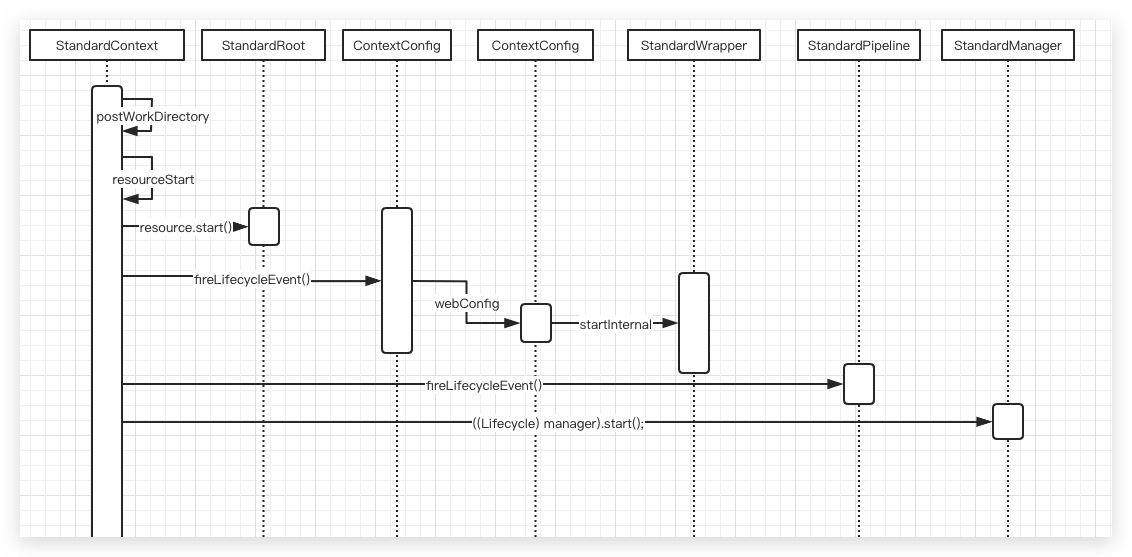
那我们知道,一个 webapp 入口是 WEB-INF ,因为里边包含了 web.xml 以及 lib包,所以此时就是扫描 lib 下所有的 jar 包,然后加载到 webappClassLoader 中去。所以这个时候 StandardRoot 做的事情就是加载所有的 jar 包。

二. 发送事件通知加载web应用

上面图我们可以看到,fireLifecycleEvent 通知了 ContextConfig 加载 webapp 的配置、加载所有 Pipeline。 先看第一个:

2.1 加载配置

1
2
3
4
5
6
7
8
9
10
11
12
13
14
15
16
17
18
19
20
21
22
23
24
25
26
27
28
29
30
31
32
33
34
35
36
37
38
39
40
41
42
43
44
45
46
47
48
49
50
51
52
53
54
55
56
57
58
59
60
61
62
63
64
65
66
67
68
69
70
71
72
73
74
75
76
77
78
79
80
81
82
83
84
85
86
87
88
89
90
91
92
93
94
95
96
97
98
99
100
101
102
103
104
105
106
107
108
109
110
111
112
113
114
115
116
117
118
119
120
121
122
123
124
125
126
127
128
129
130
131
132
133
134
135
136
137
138
139
140
141
142
143
144
145
146
147
148
149
150
151
152
153
public class ContextConfig implements LifecycleListener {
protected synchronized void configureStart() {
// Called from StandardContext.start()

if (log.isDebugEnabled()) {
log.debug(sm.getString("contextConfig.start"));
}

if (log.isDebugEnabled()) {
log.debug(sm.getString("contextConfig.xmlSettings",
context.getName(),
Boolean.valueOf(context.getXmlValidation()),
Boolean.valueOf(context.getXmlNamespaceAware())));
}
// 配置webConfig,会将项目中的web.xml跟tomcat目录下的web.xml合并
// 并且加载所有必要的jar包
webConfig();

if (!context.getIgnoreAnnotations()) {
applicationAnnotationsConfig();
}
if (ok) {
// 一堆配置鉴权的东西,tomcat-users.xml配置的东西
validateSecurityRoles();
}

if (ok) {
authenticatorConfig();
}

if (log.isDebugEnabled()) {
log.debug("Pipeline Configuration:");
Pipeline pipeline = context.getPipeline();
Valve valves[] = null;
if (pipeline != null) {
valves = pipeline.getValves();
}
if (valves != null) {
for (int i = 0; i < valves.length; i++) {
log.debug(" " + valves[i].getClass().getName());
}
}
log.debug("======================");
}

// Make our application available if no problems were encountered
if (ok) {
context.setConfigured(true);
} else {
log.error(sm.getString("contextConfig.unavailable"));
context.setConfigured(false);
}
}

protected void webConfig() {
WebXmlParser webXmlParser = new WebXmlParser(context.getXmlNamespaceAware(),
context.getXmlValidation(), context.getXmlBlockExternal());
// 加载全局的web.xml
Set<WebXml> defaults = new HashSet<>();
defaults.add(getDefaultWebXmlFragment(webXmlParser));

WebXml webXml = createWebXml();

// 开始解析webapp的web.xml
InputSource contextWebXml = getContextWebXmlSource();
if (!webXmlParser.parseWebXml(contextWebXml, webXml, false)) {
ok = false;
}

ServletContext sContext = context.getServletContext();

// Ordering is important here

// Step 1. 加载所有jar包的web-fragment.xml
Map<String,WebXml> fragments = processJarsForWebFragments(webXml, webXmlParser);

// Step 2. 排序上面加载的web-fragment.xml.
Set<WebXml> orderedFragments = null;
orderedFragments =
WebXml.orderWebFragments(webXml, fragments, sContext);

// Step 3. 查找ServletContainerInitializer接口实现类
if (ok) {
processServletContainerInitializers();
}

if (!webXml.isMetadataComplete() typeInitializerMap.size() > 0) {
// 处理web-fragment.xml
processClasses(webXml, orderedFragments);
}

if (!webXml.isMetadataComplete()) {
// Step 6. 合并所有的web-fragment.xml
if (ok) {
ok = webXml.merge(orderedFragments);
}

// Step 7. 合并默认配置
webXml.merge(defaults);

// Step 8. JSP转Servlet
if (ok) {
convertJsps(webXml);
}

// Step 9. 应用合并以后的web.xml对象
if (ok) {
configureContext(webXml);
}
} else {
webXml.merge(defaults);
convertJsps(webXml);
configureContext(webXml);
}

if (context.getLogEffectiveWebXml()) {
log.info("web.xml:\n" + webXml.toXml());
}


// Step 10. 查找静态资源
if (ok) {
// Spec does not define an order.
// Use ordered JARs followed by remaining JARs
Set<WebXml> resourceJars = new LinkedHashSet<>();
for (WebXml fragment : orderedFragments) {
resourceJars.add(fragment);
}
for (WebXml fragment : fragments.values()) {
if (!resourceJars.contains(fragment)) {
resourceJars.add(fragment);
}
}
processResourceJARs(resourceJars);
}

// Step 11. 应用ServletContainerInitializer配置
if (ok) {
for (Map.Entry<ServletContainerInitializer,
Set<Class<?>>> entry :
initializerClassMap.entrySet()) {
if (entry.getValue().isEmpty()) {
context.addServletContainerInitializer(
entry.getKey(), null);
} else {
context.addServletContainerInitializer(
entry.getKey(), entry.getValue());
}
}
}
}

}

2.2 StandardPipeline初始化

BasicAuthenticatorStandardContextValue 分别初始化,Pipeline 的内容打算后面请求的时候再看…

三. StandardManager启动

StandardManager 就负责了 Session 的事情:

1
2
3
4
5
6
7
8
9
10
11
12
13
14
15
16
17
public class StandardManager extends ManagerBase {
@Override
protected synchronized void startInternal() throws LifecycleException {
// 在父级抽象,准备Session的一些工具容器
super.startInternal();

// 读取被序列化到硬盘的session
try {
load();
} catch (Throwable t) {
ExceptionUtils.handleThrowable(t);
log.error(sm.getString("standardManager.managerLoad"), t);
}

setState(LifecycleState.STARTING);
}
}

到这里为止,所以异步启动容器的任务就都完成了,接下来就看看怎么处理请求。

四. 管理连接的类NioEndpoint

之前说过,在启动 StandardService 的时候,会初始化 connectors,这时候 Connector[HTTP/1.1-8080] 也会被初始化,这是一个处理 HTTP请求 的关键连接器。而这个连接器有一个 protocolHandler,也就是 协议处理器,现在 8.5 使用的是 Http11NioProtocol 这个处理类来处理。 Connector[HTTP/1.1-8080] 在初始化的时候,就会初始化 Http11NioProtocolHttp11NioProtocol 就包含了 Endpoint,理解为 终端口 吧,也就是请求进来的地方,在 NioEndpoint 初始化的时候,就会绑定到系统的端口里面:

1
2
3
4
5
6
7
8
9
10
11
12
13
14
15
16
17
18
19
20
21
22
23
24
25
26
27
28
29
30
31
32
33
34
35
36
37
38
39
40
41
42
43
public class NioEndpoint extends AbstractJsseEndpoint<NioChannel> {

@Override
public void bind() throws Exception {

if (!getUseInheritedChannel()) {
// 打开ServerSocketChannel
serverSock = ServerSocketChannel.open();
socketProperties.setProperties(serverSock.socket());
InetSocketAddress addr = (getAddress()!=null?new InetSocketAddress(getAddress(),getPort()):new InetSocketAddress(getPort()));
// 绑定端口
serverSock.socket().bind(addr,getAcceptCount());
} else {
// Retrieve the channel provided by the OS
Channel ic = System.inheritedChannel();
if (ic instanceof ServerSocketChannel) {
serverSock = (ServerSocketChannel) ic;
}
if (serverSock == null) {
throw new IllegalArgumentException(sm.getString("endpoint.init.bind.inherited"));
}
}
serverSock.configureBlocking(true); //mimic APR behavior

// 初始化acceptor、poller的线程数
if (acceptorThreadCount == 0) {
// FIXME: Doesn't seem to work that well with multiple accept threads
acceptorThreadCount = 1;
}
if (pollerThreadCount <= 0) {
//minimum one poller thread
pollerThreadCount = 1;
}
setStopLatch(new CountDownLatch(pollerThreadCount));

// Initialize SSL if needed
initialiseSsl();

selectorPool.open();
}


}

初始化完成以后,StandardService 会经过 startInternal 函数,即开启容器内部所有的组件,那么 NioEndpoint 相对应的组件 Acceptor Poller 即会被开启线程:

1
2
3
4
5
6
7
8
9
10
11
12
13
14
15
16
17
18
19
20
21
22
23
24
25
26
27
28
29
30
31
32
33
34
35
36
37
38
39
40
41
42
43
44
45
46
47
48
49
50
51
52
53
54
55
56
57
58
59
60
61
62
63
64
65
66
67
68
69
70
71
72
73
74
75
public class NioEndpoint extends AbstractJsseEndpoint<NioChannel> {
@Override
public void startInternal() throws Exception {
// 启动Connector的时候顺带启动NioEndpoint
if (!running) {
running = true;
paused = false;

processorCache = new SynchronizedStack<>(SynchronizedStack.DEFAULT_SIZE,
socketProperties.getProcessorCache());
eventCache = new SynchronizedStack<>(SynchronizedStack.DEFAULT_SIZE,
socketProperties.getEventCache());
nioChannels = new SynchronizedStack<>(SynchronizedStack.DEFAULT_SIZE,
socketProperties.getBufferPool());

// 创建任务队列
if ( getExecutor() == null ) {
createExecutor();
}

// 初始化最大连接数,默认是10000
initializeConnectionLatch();

// 开启 poller 所有的线程
pollers = new Poller[getPollerThreadCount()];
for (int i=0; i<pollers.length; i++) {
pollers[i] = new Poller();
Thread pollerThread = new Thread(pollers[i], getName() + "-ClientPoller-"+i);
pollerThread.setPriority(threadPriority);
pollerThread.setDaemon(true);
pollerThread.start();
}
// 开启Acceptor所有的线程
startAcceptorThreads();
}
}

protected final void startAcceptorThreads() {
int count = getAcceptorThreadCount();
acceptors = new Acceptor[count];

for (int i = 0; i < count; i++) {
acceptors[i] = createAcceptor();
String threadName = getName() + "-Acceptor-" + i;
acceptors[i].setThreadName(threadName);
Thread t = new Thread(acceptors[i], threadName);
t.setPriority(getAcceptorThreadPriority());
t.setDaemon(getDaemon());
t.start();
}
}

/**
* 创建Worker线程,用来处理请求
*/
public void createExecutor() {
internalExecutor = true;
TaskQueue taskqueue = new TaskQueue();
TaskThreadFactory tf = new TaskThreadFactory(getName() + "-exec-", daemon, getThreadPriority());
executor = new ThreadPoolExecutor(getMinSpareThreads(), getMaxThreads(), 60, TimeUnit.SECONDS,taskqueue, tf);
taskqueue.setParent( (ThreadPoolExecutor) executor);
}

/**
* 初始化连接限流器
*/
protected LimitLatch initializeConnectionLatch() {
if (maxConnections==-1) return null;
if (connectionLimitLatch==null) {
connectionLimitLatch = new LimitLatch(getMaxConnections());
}
return connectionLimitLatch;
}

}

所以在这个开启中,启动了 acceptors pollers 以及 workers ,这些线程也是构成 Tomcat 处理请求返回响应的关键。