SpringBoot OK,现代 Java 开发者应该都对 SpringBoot 很熟悉了吧,一个很 "轻量级" 的 IOC 容器。 我记得 SpringBoot 刚出来的时候,很多博客文章都会说 SpringBoot 减轻了 Java 开发工作者的负担,是个轻量级的框架。然而后面我才发现,并不轻量级。因为,SpringBoot 把需要依赖的东西给封装了起来,但其实比起之前自己控制依赖项目来说,反而会更重了一些,毕竟以前还可以自由组合。现在,SpringBoot 以及框架作者都提供了默认的依赖以及默认的配置,所以说这个框架轻量级其实并不是,要说轻量级应该只是说开发轻量级而已,菜鸟也可以快速上手建立一个后台项目而不必去关心太多项目配置的东西。 框架肯定是一个优秀的框架,我们项目全体也都是 SpringBoot 架构起来的,所以还是需要看看,SpringBoot 偷偷帮我们做了什么事情。
依赖简化 日常使用中,我们只需要引入一个 starter,就可以神奇把我们整合的框架整合起来。但是在以前,我们要使用 MyBatis 的时候,却需要引入 org.mybatis:mybatis 主框架,然后还因为需要整合 Spring 框架,所以我们还需要引入一个 org.mybatis:mybatis-spring。这就算了,这两个包如果版本号对不上,还要出现兼容性的问题。 然而现在我们只需要一个 org.mybatis.spring.boot:mybatis-spring-boot-starter,就可以同时引入这两个包,而且版本号还解决的很OK。所以现在我们可以看看他的 pom.xml :
1
2
3
4
5
6
7
8
9
10
11
12
13
14
15
16
17
18
19
20
21
22
23
24
25
26
27
28
29
30
31
32
<project xmlns="http://maven.apache.org/POM/4.0.0" xmlns:xsi="http://www.w3.org/2001/XMLSchema-instance" xsi:schemaLocation="http://maven.apache.org/POM/4.0.0 http://maven.apache.org/xsd/maven-4.0.0.xsd"> <modelVersion>4.0.0</modelVersion> <parent> <groupId>org.mybatis.spring.boot</groupId> <artifactId>mybatis-spring-boot</artifactId> <version>1.3.1</version> </parent> <artifactId>mybatis-spring-boot-starter</artifactId> <name>mybatis-spring-boot-starter</name> <dependencies> <dependency> <groupId>org.springframework.boot</groupId> <artifactId>spring-boot-starter</artifactId> </dependency> <dependency> <groupId>org.springframework.boot</groupId> <artifactId>spring-boot-starter-jdbc</artifactId> </dependency> <dependency> <groupId>org.mybatis.spring.boot</groupId> <artifactId>mybatis-spring-boot-autoconfigure</artifactId> </dependency> <dependency> <groupId>org.mybatis</groupId> <artifactId>mybatis</artifactId> </dependency> <dependency> <groupId>org.mybatis</groupId> <artifactId>mybatis-spring</artifactId> </dependency> </dependencies> </project>
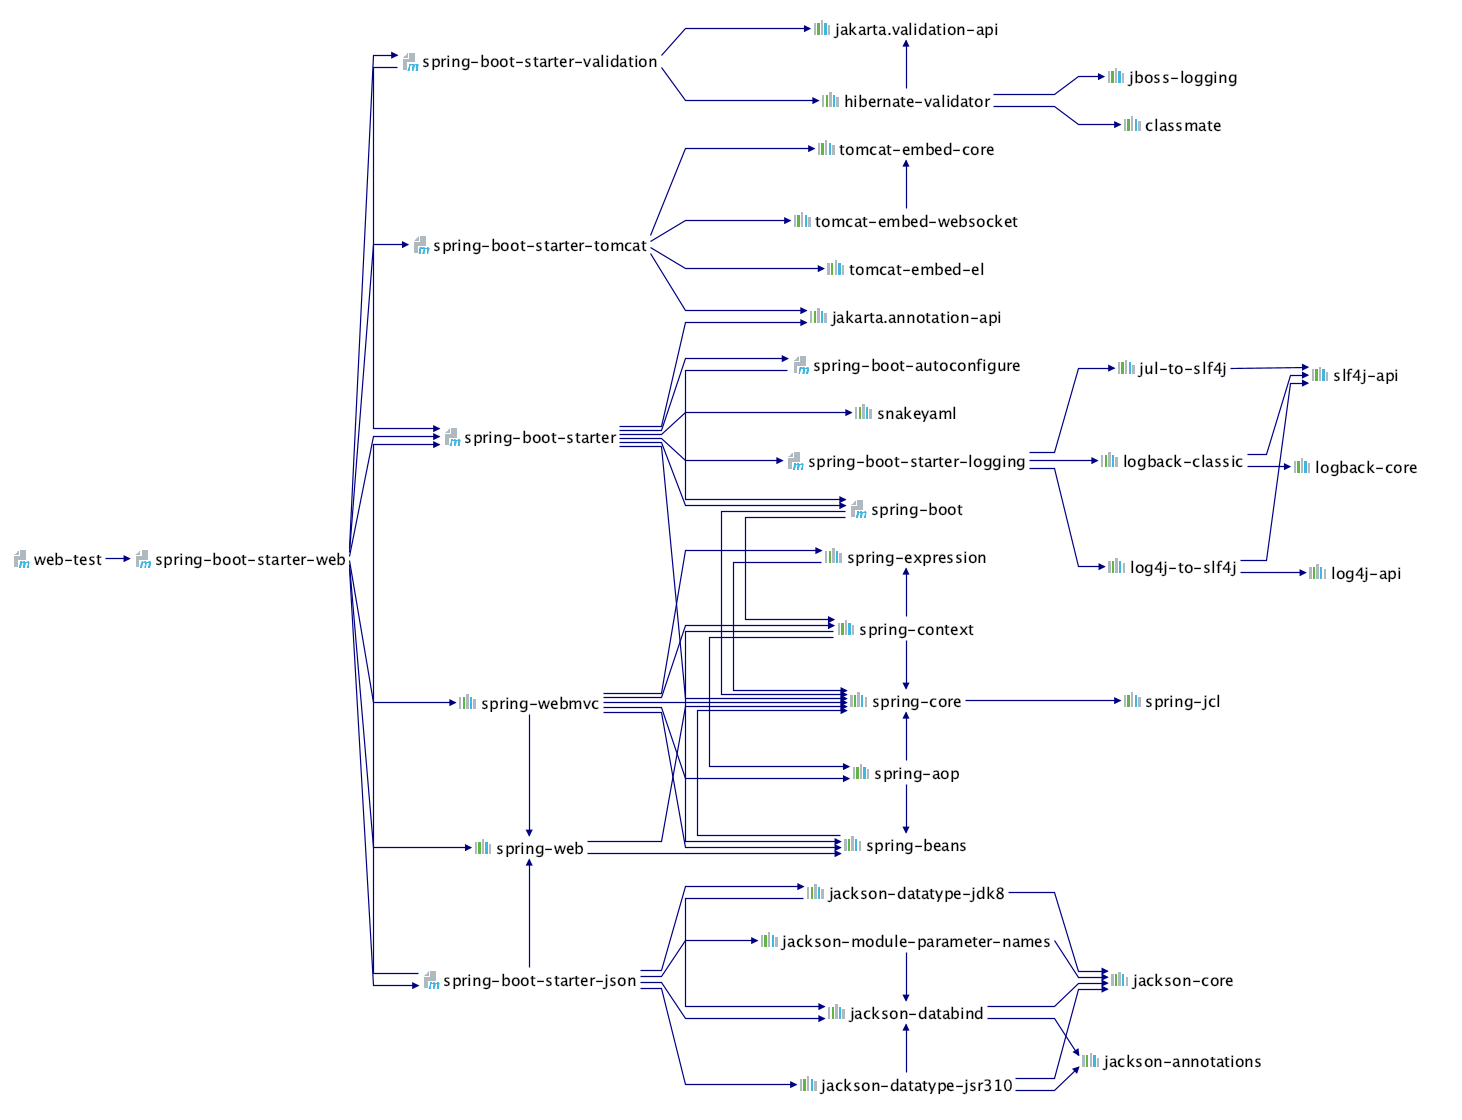
所以结论是,一个 starter,定义了需要依赖的包的版本,然后通过依赖传递将这些包传递到我们 starter 所在的项目上来。 目前我建立了一个项目,这个项目很简单,只是依赖了一个 spring-boot-starter-web, 我们可以在 idea 上很方便的查看依赖的所有东西:
但其实这个做法在以前 Spring 的时候是已经存在了,这个项目就是 Spring-IO,但我也不知道为什么,可能因为名字取得不够好吧?然后这个项目好像很少人用。或者以前的人觉得会被依赖很多东西进来所以不用这个项目了?
自动装配 我们项目所需要的依赖都弄进来了,下一步就是配置让这些包可以相互配合,共同提供服务呀。 所以,SpringBoot 所提供的第二个功能就是,根据默认的配置,装配依赖进来包里面的 Bean 实例。依赖+装配,就是我们以前一直所需要的操作了,可以说这个框架减少了全世界程序员按 CTRL+C/V 的次数hhhhh。 OK,简单了解的话,我需要一个额外的 starter,这里就使用 org.mybatis.spring.boot:mybatis-spring-boot-starter 来看,仓库地址 项目的目录结构为:
1
2
3
4
5
6
7
8
9
10
11
12
13
14
15
16
17
18
19
20
21
22
23
24
25
26
27
28
29
30
31
32
33
34
35
36
├── LICENSE ├── README.md ├── license.txt ├── mvnw ├── mvnw.cmd ├── mybatis-spring-boot-autoconfigure │ ├── format.xml │ ├── license.txt │ ├── pom.xml │ └── src ├── mybatis-spring-boot-samples │ ├── mybatis-spring-boot-sample-annotation │ ├── mybatis-spring-boot-sample-freemarker │ ├── mybatis-spring-boot-sample-freemarker-legacy │ ├── mybatis-spring-boot-sample-groovy │ ├── mybatis-spring-boot-sample-kotlin │ ├── mybatis-spring-boot-sample-thymeleaf │ ├── mybatis-spring-boot-sample-velocity │ ├── mybatis-spring-boot-sample-velocity-legacy │ ├── mybatis-spring-boot-sample-war │ ├── mybatis-spring-boot-sample-web │ ├── mybatis-spring-boot-sample-xml │ └── pom.xml ├── mybatis-spring-boot-starter │ ├── license.txt │ └── pom.xml ├── mybatis-spring-boot-starter-test │ └── pom.xml ├── mybatis-spring-boot-test-autoconfigure │ ├── format.xml │ ├── pom.xml │ └── src ├── pom.xml └── travis ├── after_success.sh └── settings.xml
其中,mybatis-spring-boot-autoconfigure 比较惹人注目,所以我们现在就看看这个项目。 首先我们看看 main/resources/META-INF/spring.factories,因为 Spring 很喜欢通过这些 meta 文件来促使各个模块很好的解耦但又能彼此配合工作,所以这个文件是定义 自动装配 开始的工厂类:
1 2 3 4 org.springframework.boot.autoconfigure.EnableAutoConfiguration =\ org.mybatis.spring.boot.autoconfigure.MybatisLanguageDriverAutoConfiguration,\ org.mybatis.spring.boot.autoconfigure.MybatisAutoConfiguration
那么通过看初步的源码,这两个类都是熟悉的 Java 装配类,那么将会被加入到前面提到的 BeanFactory 容器中,后面解析将会调用里面的配置方法。 第二个优秀的地方就是,定义配置类,就可以在 yaml 文件中提示的出现,可以利用 IDE 工具很好的防止配置名写错。这个类就是 MybatisProperties.java。
1
2
3
4
5
6
7
8
9
10
11
12
13
14
15
16
17
18
19
@ConfigurationProperties(prefix = MybatisProperties.MYBATIS_PREFIX) public class MybatisProperties { public static final String MYBATIS_PREFIX = "mybatis" ; private static final ResourcePatternResolver resourceResolver = new PathMatchingResourcePatternResolver (); private String configLocation; private String[] mapperLocations; ... }
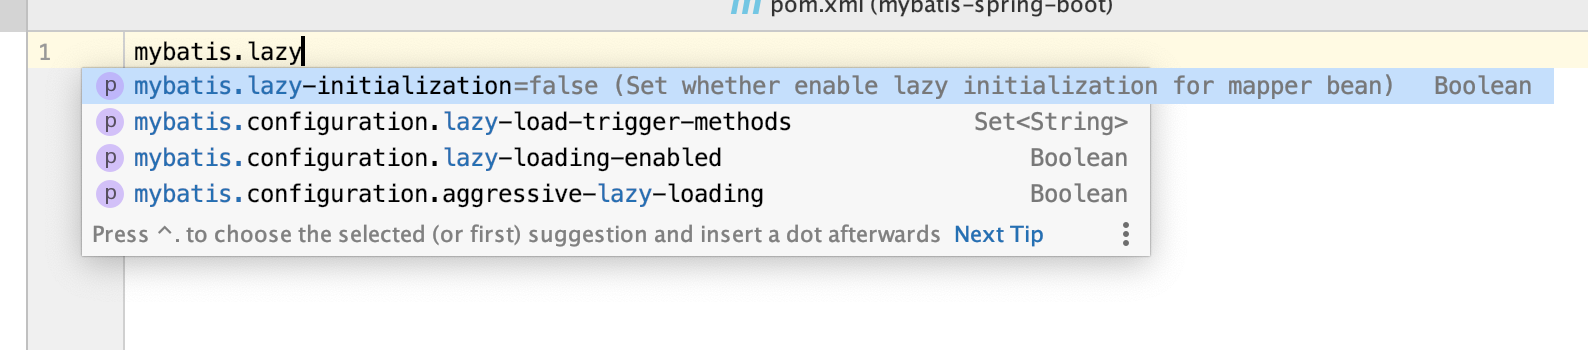
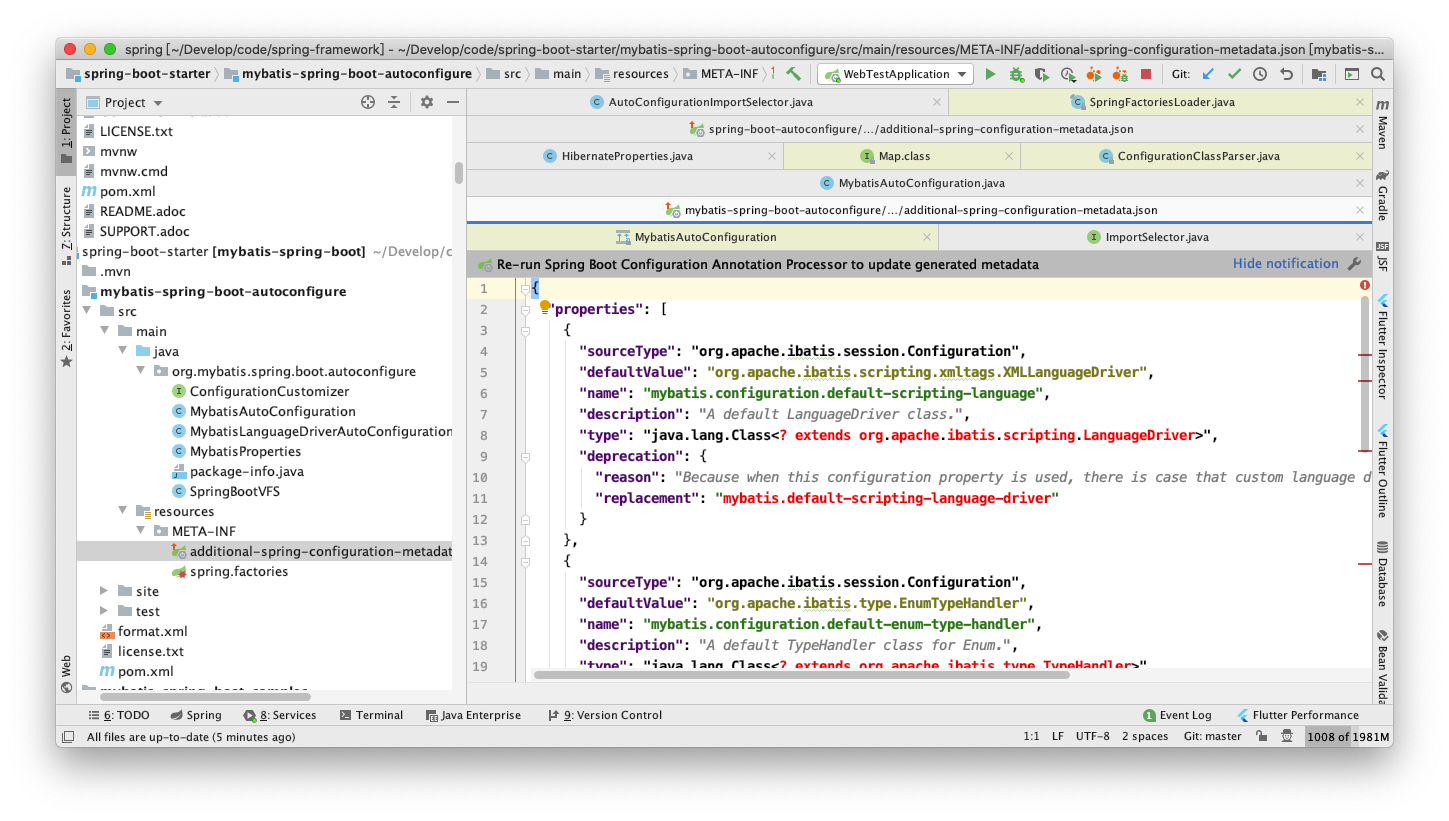
OK,我们可以看到,定义了前缀就是 mybatis,而这个类是个贫血型的 Bean,只有属性。这些属性将会贯穿 MyBatis 在项目中整个生命周期。 接下来一个问题,我并不需要每个属性都在 yaml 文件中去定义啊,有些直接使用官方提供的默认值就可以了。 所以官方又贴心的提供了 additional-spring-configuration-metadata.json 这个 JSON 文件:
1
2
3
4
5
6
7
8
9
10
11
12
13
14
15
16
17
18
19
20
21
22
23
24
25
26
27
28
29
30
31
32
33
34
35
36
37
{ "properties" : [ { "sourceType" : "org.apache.ibatis.session.Configuration" , "defaultValue" : "org.apache.ibatis.scripting.xmltags.XMLLanguageDriver" , "name" : "mybatis.configuration.default-scripting-language" , "description" : "A default LanguageDriver class." , "type" : "java.lang.Class<? extends org.apache.ibatis.scripting.LanguageDriver>" , "deprecation" : { "reason" : "Because when this configuration property is used, there is case that custom language driver cannot be registered correctly." , "replacement" : "mybatis.default-scripting-language-driver" } } , { "sourceType" : "org.apache.ibatis.session.Configuration" , "defaultValue" : "org.apache.ibatis.type.EnumTypeHandler" , "name" : "mybatis.configuration.default-enum-type-handler" , "description" : "A default TypeHandler class for Enum." , "type" : "java.lang.Class<? extends org.apache.ibatis.type.TypeHandler>" } , { "defaultValue" : false , "name" : "mybatis.lazy-initialization" , "description" : "Set whether enable lazy initialization for mapper bean." , "type" : "java.lang.Boolean" } , { "name" : "mybatis.scripting-language-driver.velocity.userdirective" , "deprecation" : { "level" : "error" , "reason" : "The 'userdirective' is deprecated since Velocity 2.x. This property defined for keeping backward compatibility with older velocity version." , "replacement" : "mybatis.scripting-language-driver.velocity.velocity-settings.runtime.custom_directives" } } ] }
不好理解的话,我们直接看第三个默认配置就好了:
1
2
3
4
5
6
{ "defaultValue" : false , "name" : "mybatis.lazy-initialization" , "description" : "Set whether enable lazy initialization for mapper bean." , "type" : "java.lang.Boolean" }
看了下图应该明白了吧,上面那个文件就是定义配置的一些说明、默认值的。
所以当我们要造一个框架,又因为很多约定的东西,靠人脑来记已经靠不住的情况下,就可以编写类似于 additional-spring-configuration-metadata.json 这种文件来做约定以及说明了。
OK,上面说完了 SpringBoot 的两个最主要的优点以后,现在就来看看源码。但是源码这块,因为 传递依赖 利用的是 mvn/gradle 的特性,所以 依赖传递 并不需要再说。 那么最主要的就是来解析,怎么自动装配的问题。
简单的SpringBoot项目 pom.xml 依赖:
1
2
3
4
5
6
7
8
9
10
11
12
13
14
15
16
17
18
19
20
21
22
23
24
25
26
27
28
29
30
31
32
33
34
35
36
37
<?xml version="1.0" encoding="UTF-8"?> <project xmlns="http://maven.apache.org/POM/4.0.0" xmlns:xsi="http://www.w3.org/2001/XMLSchema-instance" xsi:schemaLocation="http://maven.apache.org/POM/4.0.0 https://maven.apache.org/xsd/maven-4.0.0.xsd"> <modelVersion>4.0.0</modelVersion> <parent> <groupId>org.springframework.boot</groupId> <artifactId>spring-boot-starter-parent</artifactId> <version>2.3.0.BUILD-SNAPSHOT</version> <relativePath/> <!-- lookup parent from repository --> </parent> <groupId>cn.liweidan.web</groupId> <artifactId>web-test</artifactId> <version>0.0.1-SNAPSHOT</version> <name>web-test</name> <description>Demo project for Spring Boot</description> <properties> <java.version>1.8</java.version> </properties> <dependencies> <dependency> <groupId>org.springframework.boot</groupId> <artifactId>spring-boot-starter-web</artifactId> </dependency> </dependencies> <build> <plugins> <plugin> <groupId>org.springframework.boot</groupId> <artifactId>spring-boot-maven-plugin</artifactId> </plugin> </plugins> </build> </project>
一个主启动器:
1
2
3
4
5
6
7
8
@SpringBootApplication public class WebTestApplication { public static void main (String[] args) { SpringApplication.run(WebTestApplication.class, args); } }
一个控制器:
1
2
3
4
5
6
7
8
9
10
11
12
13
14
15
16
@RestController public class UserController { @GetMapping("users") public List<Map<String, String>> users () { List<Map<String, String>> users = new ArrayList <>(); for (int i = 0 ; i < 3 ; i++) { Map<String, String> u = new HashMap <>(); u.put("id" , String.valueOf(i)); u.put("name" , "name" + i); users.add(u); } return users; } }
SpringApplication元信息准备 写过 SpringBoot 项目的同学应该对这个很熟悉了,通过传递一个上下文的根类,SpringBoot 将会自动装载在此类所在的包下面的所有类,并且 args 很明显就是我们在控制台传递的参数,也一并传递给 SpringApplication.run 这个方法,SpringBoot 即可将命令行的参数配置覆盖配置文件指定的配置。 接下来看看这个类做了什么事情:
1
2
3
4
5
6
7
public static ConfigurableApplicationContext run (Class<?> primarySource, String... args) { return run(new Class <?>[] { primarySource }, args); } public static ConfigurableApplicationContext run (Class<?>[] primarySources, String[] args) { return new SpringApplication (primarySources).run(args); }
通过静态方法,传递一个 Class 类作为主资源,然后再传递给主资源数组的 run 方法。那么这个数组其实我们是可以传递多个主资源的,比如我们做项目的时候,想要每个模块包彼此分离,即可传递多个包的主资源路径。 new SpringApplication(primarySources).run(args); 才是真正的进入容器的准备阶段: 首先看看构造器
1
2
3
4
5
6
7
8
9
10
11
12
13
14
public SpringApplication (ResourceLoader resourceLoader, Class<?>... primarySources) { this .resourceLoader = resourceLoader; Assert.notNull(primarySources, "PrimarySources must not be null" ); this .primarySources = new LinkedHashSet <>(Arrays.asList(primarySources)); this .webApplicationType = WebApplicationType.deduceFromClasspath(); setInitializers((Collection) getSpringFactoriesInstances(ApplicationContextInitializer.class)); setListeners((Collection) getSpringFactoriesInstances(ApplicationListener.class)); this .mainApplicationClass = deduceMainApplicationClass(); }
加载不同模块的元信息 在上面的构造器中看到 setInitializers((Collection) getSpringFactoriesInstances(ApplicationContextInitializer.class));,Spring 还是跟以前获取 handlers 一样。通过在 META-INF 类加载路径定义不同的 spring.factories,使用类加载器读取这些配置文件资源,解析,加载配置文件中的类,初始化对象,来共同完成业务。
1
2
3
4
5
6
7
8
private <T> Collection<T> getSpringFactoriesInstances (Class<T> type, Class<?>[] parameterTypes, Object... args) { ClassLoader classLoader = getClassLoader(); Set<String> names = new LinkedHashSet <>(SpringFactoriesLoader.loadFactoryNames(type, classLoader)); List<T> instances = createSpringFactoriesInstances(type, parameterTypes, classLoader, args, names); AnnotationAwareOrderComparator.sort(instances); return instances; }
通过 SpringFactoriesLoader.loadFactoryNames(type, classLoader),加载当前 ClassLoader 中的指定类,源码显示如何读取,后面的 getOrDefault(factoryTypeName, Collections.emptyList()) 还是比较好理解的,如果加载到工厂类的名字就返回不然返回个空集合。
1
2
3
4
5
6
7
8
9
10
11
12
13
14
15
16
17
18
19
20
21
22
23
24
25
26
27
28
29
30
31
32
33
34
35
36
37
38
39
40
41
42
43
public static List<String> loadFactoryNames (Class<?> factoryType, @Nullable ClassLoader classLoader) { String factoryTypeName = factoryType.getName(); return loadSpringFactories(classLoader).getOrDefault(factoryTypeName, Collections.emptyList()); } private static Map<String, List<String>> loadSpringFactories (@Nullable ClassLoader classLoader) { MultiValueMap<String, String> result = cache.get(classLoader); if (result != null ) { return result; } try { Enumeration<URL> urls = (classLoader != null ? classLoader.getResources(FACTORIES_RESOURCE_LOCATION) : ClassLoader.getSystemResources(FACTORIES_RESOURCE_LOCATION)); result = new LinkedMultiValueMap <>(); while (urls.hasMoreElements()) { URL url = urls.nextElement(); UrlResource resource = new UrlResource (url); Properties properties = PropertiesLoaderUtils.loadProperties(resource); for (Map.Entry<?, ?> entry : properties.entrySet()) { String factoryTypeName = ((String) entry.getKey()).trim(); for (String factoryImplementationName : StringUtils.commaDelimitedListToStringArray((String) entry.getValue())) { result.add(factoryTypeName, factoryImplementationName.trim()); } } } cache.put(classLoader, result); return result; } catch (IOException ex) { throw new IllegalArgumentException ("Unable to load factories from location [" + FACTORIES_RESOURCE_LOCATION + "]" , ex); } }
启动项目SpringApplication.run 可以看到 run 的源码跟之前的 AbstractApplicationContext#refresh 的味道还是一样的,先加载一系列容器运行时需要的生命周期类(Spring 模块间的也有用户自定义的),然后 refreshContext(context) 刷新容器上下文。
1
2
3
4
5
6
7
8
9
10
11
12
13
14
15
16
17
18
19
20
21
22
23
24
25
26
27
28
29
30
31
32
33
34
35
36
37
38
39
40
41
42
43
44
45
46
47
48
49
50
51
public ConfigurableApplicationContext run (String... args) { StopWatch stopWatch = new StopWatch (); stopWatch.start(); ConfigurableApplicationContext context = null ; Collection<SpringBootExceptionReporter> exceptionReporters = new ArrayList <>(); configureHeadlessProperty(); SpringApplicationRunListeners listeners = getRunListeners(args); listeners.starting(); try { ApplicationArguments applicationArguments = new DefaultApplicationArguments (args); ConfigurableEnvironment environment = prepareEnvironment(listeners, applicationArguments); configureIgnoreBeanInfo(environment); Banner printedBanner = printBanner(environment); context = createApplicationContext(); exceptionReporters = getSpringFactoriesInstances(SpringBootExceptionReporter.class, new Class [] { ConfigurableApplicationContext.class }, context); prepareContext(context, environment, listeners, applicationArguments, printedBanner); refreshContext(context); afterRefresh(context, applicationArguments); stopWatch.stop(); if (this .logStartupInfo) { new StartupInfoLogger (this .mainApplicationClass).logStarted(getApplicationLog(), stopWatch); } listeners.started(context); callRunners(context, applicationArguments); } catch (Throwable ex) { handleRunFailure(context, ex, exceptionReporters, listeners); throw new IllegalStateException (ex); } try { listeners.running(context); } catch (Throwable ex) { handleRunFailure(context, ex, exceptionReporters, null ); throw new IllegalStateException (ex); } return context; }
装载SpringApplicationRunListener 1 2 3 4 5 private SpringApplicationRunListeners getRunListeners (String[] args) { Class<?>[] types = new Class <?>[] { SpringApplication.class, String[].class }; return new SpringApplicationRunListeners (logger, getSpringFactoriesInstances(SpringApplicationRunListener.class, types, this , args)); }
首先我们看第一步,加载所有的 SpringApplicationRunListener 子类,这个加载方式跟上面所说的加载元信息是一样的,只不过指定加载 SpringApplicationRunListener.class 类。 我们知道,Spring 经常会定义很多生命周期回调,供用户根据需求切入框架。这次 SpringBoot 的生命周期是 SpringApplicationRunListener。 首先看看 SpringApplicationRunListener 定义哪些生命周期函数:
1 2 3 4 5 6 7 8 9 10 11 12 13 14 15 16 17 18 19 20 21 22 23 24 25 26 27 28 29 30 31 public interface SpringApplicationRunListener { default void starting () { } default void environmentPrepared (ConfigurableEnvironment environment) { } default void contextPrepared (ConfigurableApplicationContext context) { } default void contextLoaded (ConfigurableApplicationContext context) { } default void started (ConfigurableApplicationContext context) { } default void running (ConfigurableApplicationContext context) { } default void failed (ConfigurableApplicationContext context, Throwable exception) { } }
准备ConfigurableEnvironment环境 1 2 3 4 5 6 7 8 9 10 11 12 13 14 15 16 17 18 19 20 21 22 23 24 25 26 27 28 29 30 31 32 33 34 35 private ConfigurableEnvironment prepareEnvironment (SpringApplicationRunListeners listeners, ApplicationArguments applicationArguments) { ConfigurableEnvironment environment = getOrCreateEnvironment(); configureEnvironment(environment, applicationArguments.getSourceArgs()); ConfigurationPropertySources.attach(environment); listeners.environmentPrepared(environment); bindToSpringApplication(environment); if (!this .isCustomEnvironment) { environment = new EnvironmentConverter (getClassLoader()).convertEnvironmentIfNecessary(environment, deduceEnvironmentClass()); } ConfigurationPropertySources.attach(environment); return environment; } private ConfigurableEnvironment getOrCreateEnvironment () { if (this .environment != null ) { return this .environment; } switch (this .webApplicationType) { case SERVLET: return new StandardServletEnvironment (); case REACTIVE: return new StandardReactiveWebEnvironment (); default : return new StandardEnvironment (); } }
然后在主线程中配置忽略 Boolean 的 Bean:
1 2 3 4 5 6 7 8 9 10 11 12 13 public ConfigurableApplicationContext run (String... args) { ConfigurableEnvironment environment = prepareEnvironment(listeners, applicationArguments); configureIgnoreBeanInfo(environment); } private void configureIgnoreBeanInfo (ConfigurableEnvironment environment) { if (System.getProperty(CachedIntrospectionResults.IGNORE_BEANINFO_PROPERTY_NAME) == null ) { Boolean ignore = environment.getProperty("spring.beaninfo.ignore" , Boolean.class, Boolean.TRUE); System.setProperty(CachedIntrospectionResults.IGNORE_BEANINFO_PROPERTY_NAME, ignore.toString()); } }
创建上下文 1 2 3 4 context = createApplicationContext(); exceptionReporters = getSpringFactoriesInstances(SpringBootExceptionReporter.class, new Class [] { ConfigurableApplicationContext.class }, context);
根据不同环境创建不同的上下文:
1 2 3 4 5 6 7 8 9 10 11 12 13 14 15 16 17 18 19 20 21 22 protected ConfigurableApplicationContext createApplicationContext () { Class<?> contextClass = this .applicationContextClass; if (contextClass == null ) { try { switch (this .webApplicationType) { case SERVLET: contextClass = Class.forName(DEFAULT_SERVLET_WEB_CONTEXT_CLASS); break ; case REACTIVE: contextClass = Class.forName(DEFAULT_REACTIVE_WEB_CONTEXT_CLASS); break ; default : contextClass = Class.forName(DEFAULT_CONTEXT_CLASS); } } catch (ClassNotFoundException ex) { throw new IllegalStateException ( "Unable create a default ApplicationContext, please specify an ApplicationContextClass" , ex); } } return (ConfigurableApplicationContext) BeanUtils.instantiateClass(contextClass); }
Context准备工作 1 2 3 4 5 6 7 8 9 10 11 12 13 14 15 16 17 18 19 20 21 22 23 24 25 26 27 28 29 30 31 32 33 34 35 private void prepareContext (ConfigurableApplicationContext context, ConfigurableEnvironment environment, SpringApplicationRunListeners listeners, ApplicationArguments applicationArguments, Banner printedBanner) { context.setEnvironment(environment); postProcessApplicationContext(context); applyInitializers(context); listeners.contextPrepared(context); if (this .logStartupInfo) { logStartupInfo(context.getParent() == null ); logStartupProfileInfo(context); } ConfigurableListableBeanFactory beanFactory = context.getBeanFactory(); beanFactory.registerSingleton("springApplicationArguments" , applicationArguments); if (printedBanner != null ) { beanFactory.registerSingleton("springBootBanner" , printedBanner); } if (beanFactory instanceof DefaultListableBeanFactory) { ((DefaultListableBeanFactory) beanFactory) .setAllowBeanDefinitionOverriding(this .allowBeanDefinitionOverriding); } if (this .lazyInitialization) { context.addBeanFactoryPostProcessor(new LazyInitializationBeanFactoryPostProcessor ()); } Set<Object> sources = getAllSources(); Assert.notEmpty(sources, "Sources must not be empty" ); load(context, sources.toArray(new Object [0 ])); listeners.contextLoaded(context); }
其实当前 postProcessApplicationContext 除了注册 ConversionService 以外其他事情都没做。
refreshContext刷新上下文 因为我要看看自动装配的问题,所以这个时候为了故事比较好说,我加了 mybatis-spring-boot-starter:
1 2 3 4 5 6 7 8 9 10 11 12 13 14 15 16 17 18 19 20 21 22 23 24 25 26 27 28 29 30 31 32 33 34 35 36 37 38 39 40 41 42 43 44 45 46 47 48 <?xml version="1.0" encoding="UTF-8"?> <project xmlns="http://maven.apache.org/POM/4.0.0" xmlns:xsi="http://www.w3.org/2001/XMLSchema-instance" xsi:schemaLocation="http://maven.apache.org/POM/4.0.0 https://maven.apache.org/xsd/maven-4.0.0.xsd"> <modelVersion>4.0.0</modelVersion> <parent> <groupId>org.springframework.boot</groupId> <artifactId>spring-boot-starter-parent</artifactId> <version>2.3.0.BUILD-SNAPSHOT</version> <relativePath/> <!-- lookup parent from repository --> </parent> <groupId>cn.liweidan.web</groupId> <artifactId>web-test</artifactId> <version>0.0.1-SNAPSHOT</version> <name>web-test</name> <description>Demo project for Spring Boot</description> <properties> <java.version>1.8</java.version> </properties> <dependencies> <dependency> <groupId>org.springframework.boot</groupId> <artifactId>spring-boot-starter-web</artifactId> </dependency> <dependency> <groupId>org.mybatis.spring.boot</groupId> <artifactId>mybatis-spring-boot-starter</artifactId> <version>2.1.1</version> </dependency> <dependency> <groupId>com.h2database</groupId> <artifactId>h2</artifactId> <version>1.4.197</version> </dependency> </dependencies> <build> <plugins> <plugin> <groupId>org.springframework.boot</groupId> <artifactId>spring-boot-maven-plugin</artifactId> </plugin> </plugins> </build> </project>
刷新上下文:
1 2 3 4 5 6 7 8 9 10 11 12 13 14 15 private void refreshContext (ConfigurableApplicationContext context) { refresh(context); if (this .registerShutdownHook) { try { context.registerShutdownHook(); } catch (AccessControlException ex) { } } } protected void refresh (ApplicationContext applicationContext) { Assert.isInstanceOf(AbstractApplicationContext.class, applicationContext); ((AbstractApplicationContext) applicationContext).refresh(); }
然后接下来就去到我们熟悉的 AbstractApplicationContext 中,重温一下这个 refresh() 方法:
1 2 3 4 5 6 7 8 9 10 11 12 13 14 15 16 17 18 19 20 21 22 23 24 25 26 27 28 29 30 31 32 33 34 35 36 37 38 39 40 41 42 43 44 45 46 47 48 49 50 51 52 53 54 55 56 57 58 59 60 61 62 63 64 @Override public void refresh () throws BeansException, IllegalStateException { synchronized (this .startupShutdownMonitor) { prepareRefresh(); ConfigurableListableBeanFactory beanFactory = obtainFreshBeanFactory(); prepareBeanFactory(beanFactory); try { postProcessBeanFactory(beanFactory); invokeBeanFactoryPostProcessors(beanFactory); registerBeanPostProcessors(beanFactory); initMessageSource(); initApplicationEventMulticaster(); onRefresh(); registerListeners(); finishBeanFactoryInitialization(beanFactory); finishRefresh(); } catch (BeansException ex) { if (logger.isWarnEnabled()) { logger.warn("Exception encountered during context initialization - " + "cancelling refresh attempt: " + ex); } destroyBeans(); cancelRefresh(ex); throw ex; } finally { resetCommonCaches(); } } }
同之前一样,在 invokeBeanFactoryPostProcessors(beanFactory) 这句话出现了 BeanDefinition 数量的剧增,那么我们可以推断出,这句话还是关键,就是在这句话开始解析我们的项目依赖。
其实按照我的猜测,自动配置应该是 starter 提供了一些配置类交给 SpringBoot 注入 Spring 的 BeanFactory 中,但是现在看来,好像 SpringBoot 就不需要做什么东西,直接委托给容器扫描解析执行了。
invokeBeanFactoryPostProcessors 1 2 3 4 5 6 7 8 9 10 11 protected void invokeBeanFactoryPostProcessors (ConfigurableListableBeanFactory beanFactory) { PostProcessorRegistrationDelegate.invokeBeanFactoryPostProcessors(beanFactory, getBeanFactoryPostProcessors()); if (beanFactory.getTempClassLoader() == null && beanFactory.containsBean(LOAD_TIME_WEAVER_BEAN_NAME)) { beanFactory.addBeanPostProcessor(new LoadTimeWeaverAwareProcessor (beanFactory)); beanFactory.setTempClassLoader(new ContextTypeMatchClassLoader (beanFactory.getBeanClassLoader())); } }
PostProcessorRegistrationDelegate委派对象 这是一个在 Context 模块下对象,主要处理 PostProcessor 相关的事情,看到签名只提供两个方法:
invokeBeanFactoryPostProcessors 执行 BF 的 PostProcessors
registerBeanPostProcessors 注册 PostProcessors 到 BF 中
关于普通的配置类解析,之前在 chapters3_高级的Beafctory—Spring上下文 已经有提到,解析项目中配置类不明白的话可以先看看那篇文章。 不过我们现在重点是怎么读取到 starter 框架里边的自动配置信息:
1 2 3 4 5 6 7 private static void invokeBeanDefinitionRegistryPostProcessors ( Collection<? extends BeanDefinitionRegistryPostProcessor> postProcessors, BeanDefinitionRegistry registry) { for (BeanDefinitionRegistryPostProcessor postProcessor : postProcessors) { postProcessor.postProcessBeanDefinitionRegistry(registry); } }
当前 postProcessors 里边只有一个 ConfigurationClassPostProcessor 那我们进入对应的 postProcessBeanDefinitionRegistry 方法:
1 2 3 4 5 6 7 8 9 10 11 12 13 14 15 @Override public void postProcessBeanDefinitionRegistry (BeanDefinitionRegistry registry) { int registryId = System.identityHashCode(registry); if (this .registriesPostProcessed.contains(registryId)) { throw new IllegalStateException ( "postProcessBeanDefinitionRegistry already called on this post-processor against " + registry); } if (this .factoriesPostProcessed.contains(registryId)) { throw new IllegalStateException ( "postProcessBeanFactory already called on this post-processor against " + registry); } this .registriesPostProcessed.add(registryId); processConfigBeanDefinitions(registry); }
processConfigBeanDefinitions 解析配置
由于我们现在需要跟自动导入的配置,所以我们应该需要跟的类配置是我们的主类,也就是 WebTestApplication 这个类,这个类上修饰的注解 @SpringBootApplication 是自动注入的关键
这个才是执行自动配置的重点之重:
1 2 3 4 5 6 7 8 9 10 11 12 13 14 15 16 17 18 19 20 21 22 23 24 25 26 27 28 29 30 31 32 33 34 35 36 37 38 39 40 41 42 43 44 45 46 47 48 49 50 51 52 53 54 55 56 57 58 59 60 61 62 63 64 65 66 67 68 69 70 71 72 73 74 75 76 77 78 79 80 81 82 83 84 85 86 87 88 89 90 91 92 93 94 95 96 97 98 99 100 101 102 103 104 105 106 107 public void processConfigBeanDefinitions (BeanDefinitionRegistry registry) { List<BeanDefinitionHolder> configCandidates = new ArrayList <>(); String[] candidateNames = registry.getBeanDefinitionNames(); for (String beanName : candidateNames) { BeanDefinition beanDef = registry.getBeanDefinition(beanName); if (beanDef.getAttribute(ConfigurationClassUtils.CONFIGURATION_CLASS_ATTRIBUTE) != null ) { if (logger.isDebugEnabled()) { logger.debug("Bean definition has already been processed as a configuration class: " + beanDef); } } else if (ConfigurationClassUtils.checkConfigurationClassCandidate(beanDef, this .metadataReaderFactory)) { configCandidates.add(new BeanDefinitionHolder (beanDef, beanName)); } } if (configCandidates.isEmpty()) { return ; } configCandidates.sort((bd1, bd2) -> { int i1 = ConfigurationClassUtils.getOrder(bd1.getBeanDefinition()); int i2 = ConfigurationClassUtils.getOrder(bd2.getBeanDefinition()); return Integer.compare(i1, i2); }); SingletonBeanRegistry sbr = null ; if (registry instanceof SingletonBeanRegistry) { sbr = (SingletonBeanRegistry) registry; if (!this .localBeanNameGeneratorSet) { BeanNameGenerator generator = (BeanNameGenerator) sbr.getSingleton( AnnotationConfigUtils.CONFIGURATION_BEAN_NAME_GENERATOR); if (generator != null ) { this .componentScanBeanNameGenerator = generator; this .importBeanNameGenerator = generator; } } } if (this .environment == null ) { this .environment = new StandardEnvironment (); } ConfigurationClassParser parser = new ConfigurationClassParser ( this .metadataReaderFactory, this .problemReporter, this .environment, this .resourceLoader, this .componentScanBeanNameGenerator, registry); Set<BeanDefinitionHolder> candidates = new LinkedHashSet <>(configCandidates); Set<ConfigurationClass> alreadyParsed = new HashSet <>(configCandidates.size()); do { parser.parse(candidates); parser.validate(); Set<ConfigurationClass> configClasses = new LinkedHashSet <>(parser.getConfigurationClasses()); configClasses.removeAll(alreadyParsed); if (this .reader == null ) { this .reader = new ConfigurationClassBeanDefinitionReader ( registry, this .sourceExtractor, this .resourceLoader, this .environment, this .importBeanNameGenerator, parser.getImportRegistry()); } this .reader.loadBeanDefinitions(configClasses); alreadyParsed.addAll(configClasses); candidates.clear(); if (registry.getBeanDefinitionCount() > candidateNames.length) { String[] newCandidateNames = registry.getBeanDefinitionNames(); Set<String> oldCandidateNames = new HashSet <>(Arrays.asList(candidateNames)); Set<String> alreadyParsedClasses = new HashSet <>(); for (ConfigurationClass configurationClass : alreadyParsed) { alreadyParsedClasses.add(configurationClass.getMetadata().getClassName()); } for (String candidateName : newCandidateNames) { if (!oldCandidateNames.contains(candidateName)) { BeanDefinition bd = registry.getBeanDefinition(candidateName); if (ConfigurationClassUtils.checkConfigurationClassCandidate(bd, this .metadataReaderFactory) && !alreadyParsedClasses.contains(bd.getBeanClassName())) { candidates.add(new BeanDefinitionHolder (bd, candidateName)); } } } candidateNames = newCandidateNames; } } while (!candidates.isEmpty()); if (sbr != null && !sbr.containsSingleton(IMPORT_REGISTRY_BEAN_NAME)) { sbr.registerSingleton(IMPORT_REGISTRY_BEAN_NAME, parser.getImportRegistry()); } if (this .metadataReaderFactory instanceof CachingMetadataReaderFactory) { ((CachingMetadataReaderFactory) this .metadataReaderFactory).clearCache(); } }
重点看看 parser.parse(candidates); 这句话是怎么解析的:
1 2 3 4 5 6 7 8 9 10 11 12 13 14 15 16 17 18 19 20 21 22 23 24 25 26 27 28 29 30 31 32 33 34 35 36 37 38 39 40 41 42 43 44 45 46 47 48 49 50 51 52 53 54 55 56 57 58 59 60 61 62 63 64 public void parse (Set<BeanDefinitionHolder> configCandidates) { for (BeanDefinitionHolder holder : configCandidates) { BeanDefinition bd = holder.getBeanDefinition(); try { if (bd instanceof AnnotatedBeanDefinition) { parse(((AnnotatedBeanDefinition) bd).getMetadata(), holder.getBeanName()); } else if (bd instanceof AbstractBeanDefinition && ((AbstractBeanDefinition) bd).hasBeanClass()) { parse(((AbstractBeanDefinition) bd).getBeanClass(), holder.getBeanName()); } else { parse(bd.getBeanClassName(), holder.getBeanName()); } } catch (BeanDefinitionStoreException ex) { throw ex; } catch (Throwable ex) { throw new BeanDefinitionStoreException ( "Failed to parse configuration class [" + bd.getBeanClassName() + "]" , ex); } } this .deferredImportSelectorHandler.process(); } protected final void parse (AnnotationMetadata metadata, String beanName) throws IOException { processConfigurationClass(new ConfigurationClass (metadata, beanName)); } protected void processConfigurationClass (ConfigurationClass configClass) throws IOException { if (this .conditionEvaluator.shouldSkip(configClass.getMetadata(), ConfigurationPhase.PARSE_CONFIGURATION)) { return ; } ConfigurationClass existingClass = this .configurationClasses.get(configClass); if (existingClass != null ) { if (configClass.isImported()) { if (existingClass.isImported()) { existingClass.mergeImportedBy(configClass); } return ; } else { this .configurationClasses.remove(configClass); this .knownSuperclasses.values().removeIf(configClass::equals); } } SourceClass sourceClass = asSourceClass(configClass); do { sourceClass = doProcessConfigurationClass(configClass, sourceClass); } while (sourceClass != null ); this .configurationClasses.put(configClass, configClass); }
然后我们要进入 doProcessConfigurationClass 观察解析的过程。 这串代码其实有点长……:
1 2 3 4 5 6 7 8 9 10 11 12 13 14 15 16 17 18 19 20 21 22 23 24 25 26 27 28 29 30 31 32 33 34 35 36 37 38 39 40 41 42 43 44 45 46 47 48 49 50 51 52 53 54 55 56 57 58 59 60 61 62 63 64 65 66 67 68 69 70 71 72 73 74 75 76 77 78 79 80 81 82 @Nullable protected final SourceClass doProcessConfigurationClass (ConfigurationClass configClass, SourceClass sourceClass) throws IOException { if (configClass.getMetadata().isAnnotated(Component.class.getName())) { processMemberClasses(configClass, sourceClass); } for (AnnotationAttributes propertySource : AnnotationConfigUtils.attributesForRepeatable( sourceClass.getMetadata(), PropertySources.class, org.springframework.context.annotation.PropertySource.class)) { if (this .environment instanceof ConfigurableEnvironment) { processPropertySource(propertySource); } else { logger.info("Ignoring @PropertySource annotation on [" + sourceClass.getMetadata().getClassName() + "]. Reason: Environment must implement ConfigurableEnvironment" ); } } Set<AnnotationAttributes> componentScans = AnnotationConfigUtils.attributesForRepeatable( sourceClass.getMetadata(), ComponentScans.class, ComponentScan.class); if (!componentScans.isEmpty() && !this .conditionEvaluator.shouldSkip(sourceClass.getMetadata(), ConfigurationPhase.REGISTER_BEAN)) { for (AnnotationAttributes componentScan : componentScans) { Set<BeanDefinitionHolder> scannedBeanDefinitions = this .componentScanParser.parse(componentScan, sourceClass.getMetadata().getClassName()); for (BeanDefinitionHolder holder : scannedBeanDefinitions) { BeanDefinition bdCand = holder.getBeanDefinition().getOriginatingBeanDefinition(); if (bdCand == null ) { bdCand = holder.getBeanDefinition(); } if (ConfigurationClassUtils.checkConfigurationClassCandidate(bdCand, this .metadataReaderFactory)) { parse(bdCand.getBeanClassName(), holder.getBeanName()); } } } } processImports(configClass, sourceClass, getImports(sourceClass), true ); AnnotationAttributes importResource = AnnotationConfigUtils.attributesFor(sourceClass.getMetadata(), ImportResource.class); if (importResource != null ) { String[] resources = importResource.getStringArray("locations" ); Class<? extends BeanDefinitionReader > readerClass = importResource.getClass("reader" ); for (String resource : resources) { String resolvedResource = this .environment.resolveRequiredPlaceholders(resource); configClass.addImportedResource(resolvedResource, readerClass); } } Set<MethodMetadata> beanMethods = retrieveBeanMethodMetadata(sourceClass); for (MethodMetadata methodMetadata : beanMethods) { configClass.addBeanMethod(new BeanMethod (methodMetadata, configClass)); } processInterfaces(configClass, sourceClass); if (sourceClass.getMetadata().hasSuperClass()) { String superclass = sourceClass.getMetadata().getSuperClassName(); if (superclass != null && !superclass.startsWith("java" ) && !this .knownSuperclasses.containsKey(superclass)) { this .knownSuperclasses.put(superclass, configClass); return sourceClass.getSuperClass(); } } return null ; }
好了,可以看到通过 Java 类的解析可谓覆盖到尼玛我想象不到的地方….但他们就是应该要有 挑重点来看吧,我的主类没有父级也没有接口,直接重点看 processImports(configClass, sourceClass, getImports(sourceClass), true) 这句话。 这句话首先需要获取所有的导入配置 getImports(sourceClass):
1 2 3 4 5 6 private Set<SourceClass> getImports (SourceClass sourceClass) throws IOException { Set<SourceClass> imports = new LinkedHashSet <>(); Set<SourceClass> visited = new LinkedHashSet <>(); collectImports(sourceClass, imports, visited); return imports; }
1 2 3 4 5 6 7 8 9 10 11 12 13 private void collectImports (SourceClass sourceClass, Set<SourceClass> imports, Set<SourceClass> visited) throws IOException { if (visited.add(sourceClass)) { for (SourceClass annotation : sourceClass.getAnnotations()) { String annName = annotation.getMetadata().getClassName(); if (!annName.equals(Import.class.getName())) { collectImports(annotation, imports, visited); } } imports.addAll(sourceClass.getAnnotationAttributes(Import.class.getName(), "value" )); } }
这两个东西,切忌不要去 debug 一个一个看….我在这里看晕了好几个小时,应该是条件断点判断 sourceClass.getAnnotationAttributes(Import.class.getName(), "value").size() > 0 再停住
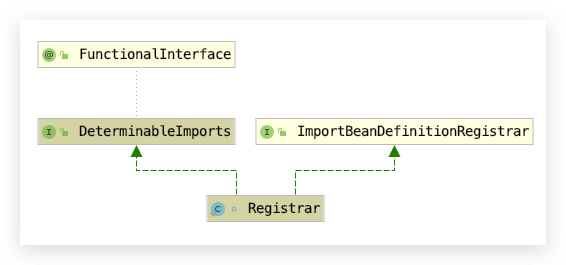
好了等到断点停住的时候,发现是 @interface SpringBootApplication > @interface EnableAutoConfiguration 上面的 @Import(AutoConfigurationImportSelector.class) 在这里导入了。以及这个类上边的 @AutoConfigurationPackage 导入了 @Import(AutoConfigurationPackages.Registrar.class) 所以当前需要解析的 importCandidates 是 AutoConfigurationPackages.Registrar.class 以及 AutoConfigurationImportSelector.class 两个类。 那么这两个类是什么用的,我现在也还不知道…先知道他被导入就好了,接下去看 processImports 方法了,这个方法应该有答案:
1 2 3 4 5 6 7 8 9 10 11 12 13 14 15 16 17 18 19 20 21 22 23 24 25 26 27 28 29 30 31 32 33 34 35 36 37 38 39 40 41 42 43 44 45 46 47 48 49 50 51 52 53 54 55 56 57 58 59 60 61 62 63 64 private void processImports (ConfigurationClass configClass, SourceClass currentSourceClass, Collection<SourceClass> importCandidates, boolean checkForCircularImports) { if (importCandidates.isEmpty()) { return ; } if (checkForCircularImports && isChainedImportOnStack(configClass)) { this .problemReporter.error(new CircularImportProblem (configClass, this .importStack)); } else { this .importStack.push(configClass); try { for (SourceClass candidate : importCandidates) { if (candidate.isAssignable(ImportSelector.class)) { Class<?> candidateClass = candidate.loadClass(); ImportSelector selector = ParserStrategyUtils.instantiateClass(candidateClass, ImportSelector.class, this .environment, this .resourceLoader, this .registry); if (selector instanceof DeferredImportSelector) { this .deferredImportSelectorHandler.handle(configClass, (DeferredImportSelector) selector); } else { String[] importClassNames = selector.selectImports(currentSourceClass.getMetadata()); Collection<SourceClass> importSourceClasses = asSourceClasses(importClassNames); processImports(configClass, currentSourceClass, importSourceClasses, false ); } } else if (candidate.isAssignable(ImportBeanDefinitionRegistrar.class)) { Class<?> candidateClass = candidate.loadClass(); ImportBeanDefinitionRegistrar registrar = ParserStrategyUtils.instantiateClass(candidateClass, ImportBeanDefinitionRegistrar.class, this .environment, this .resourceLoader, this .registry); configClass.addImportBeanDefinitionRegistrar(registrar, currentSourceClass.getMetadata()); } else { this .importStack.registerImport( currentSourceClass.getMetadata(), candidate.getMetadata().getClassName()); processConfigurationClass(candidate.asConfigClass(configClass)); } } } catch (BeanDefinitionStoreException ex) { throw ex; } catch (Throwable ex) { throw new BeanDefinitionStoreException ( "Failed to process import candidates for configuration class [" + configClass.getMetadata().getClassName() + "]" , ex); } finally { this .importStack.pop(); } } }
不行呀,因为需要根据类型来做,先给两个类的类型吧:
这三个分支对应着三个不同的配置类型:
ImportSelector 用于导入配置类的信息
Registrar 用于解析自定义注解动态生成 Bean 的信息
@Configuration 读取到配置类,直接解析
那我们就先按照上图的顺序来解析这些配置类吧,首先是 AutoConfigurationPackages.Registrar 对象的解析。我先从上面一大串截取代码片段来看:
1 2 3 4 5 6 7 8 9 10 11 else if (candidate.isAssignable(ImportBeanDefinitionRegistrar.class)) { Class<?> candidateClass = candidate.loadClass(); ImportBeanDefinitionRegistrar registrar = ParserStrategyUtils.instantiateClass(candidateClass, ImportBeanDefinitionRegistrar.class, this .environment, this .resourceLoader, this .registry); configClass.addImportBeanDefinitionRegistrar(registrar, currentSourceClass.getMetadata()); }
先放到后面,应该是解析的时候会调用到。 接下来看第二个 AutoConfigurationImportSelector.class 的解析:
1 2 3 4 5 6 7 8 9 10 11 12 13 14 15 if (candidate.isAssignable(ImportSelector.class)) { Class<?> candidateClass = candidate.loadClass(); ImportSelector selector = ParserStrategyUtils.instantiateClass(candidateClass, ImportSelector.class, this .environment, this .resourceLoader, this .registry); if (selector instanceof DeferredImportSelector) { this .deferredImportSelectorHandler.handle(configClass, (DeferredImportSelector) selector); } else { String[] importClassNames = selector.selectImports(currentSourceClass.getMetadata()); Collection<SourceClass> importSourceClasses = asSourceClasses(importClassNames); processImports(configClass, currentSourceClass, importSourceClasses, false ); } }
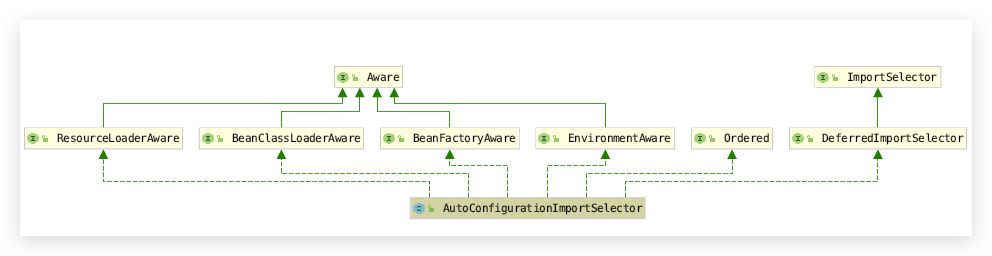
这一块比较麻烦,在上面 uml 可以看到,AutoConfigurationImportSelector.class 属于 DeferredImportSelector,所以交给 deferredImportSelectorHandler 进行处理。
1 2 3 4 5 6 7 8 9 10 11 12 13 public void handle (ConfigurationClass configClass, DeferredImportSelector importSelector) { DeferredImportSelectorHolder holder = new DeferredImportSelectorHolder ( configClass, importSelector); if (this .deferredImportSelectors == null ) { DeferredImportSelectorGroupingHandler handler = new DeferredImportSelectorGroupingHandler (); handler.register(holder); handler.processGroupImports(); } else { this .deferredImportSelectors.add(holder); } }
导入刚刚注册的配置 上面一大堆全是解析,然后接下来就要处理这些自动配置了。 回到 parser.parse(candidates); 这个方法:
1 2 3 4 5 6 7 8 9 10 11 12 13 14 15 16 17 18 19 20 21 22 23 24 25 26 public void parse (Set<BeanDefinitionHolder> configCandidates) { for (BeanDefinitionHolder holder : configCandidates) { BeanDefinition bd = holder.getBeanDefinition(); try { if (bd instanceof AnnotatedBeanDefinition) { parse(((AnnotatedBeanDefinition) bd).getMetadata(), holder.getBeanName()); } else if (bd instanceof AbstractBeanDefinition && ((AbstractBeanDefinition) bd).hasBeanClass()) { parse(((AbstractBeanDefinition) bd).getBeanClass(), holder.getBeanName()); } else { parse(bd.getBeanClassName(), holder.getBeanName()); } } catch (BeanDefinitionStoreException ex) { throw ex; } catch (Throwable ex) { throw new BeanDefinitionStoreException ( "Failed to parse configuration class [" + bd.getBeanClassName() + "]" , ex); } } this .deferredImportSelectorHandler.process(); }
AutoConfigurationImportSelector解析 1 2 3 4 5 6 7 8 9 10 11 12 13 14 15 16 17 18 public void process () { List<DeferredImportSelectorHolder> deferredImports = this .deferredImportSelectors; this .deferredImportSelectors = null ; try { if (deferredImports != null ) { DeferredImportSelectorGroupingHandler handler = new DeferredImportSelectorGroupingHandler (); deferredImports.sort(DEFERRED_IMPORT_COMPARATOR); deferredImports.forEach(handler::register); handler.processGroupImports(); } } finally { this .deferredImportSelectors = new ArrayList <>(); } }
1 2 3 4 5 6 7 8 9 10 11 12 13 14 15 16 17 18 19 20 public void processGroupImports () { for (DeferredImportSelectorGrouping grouping : this .groupings.values()) { grouping.getImports().forEach(entry -> { ConfigurationClass configurationClass = this .configurationClasses.get( entry.getMetadata()); try { processImports(configurationClass, asSourceClass(configurationClass), asSourceClasses(entry.getImportClassName()), false ); } catch (BeanDefinitionStoreException ex) { throw ex; } catch (Throwable ex) { throw new BeanDefinitionStoreException ( "Failed to process import candidates for configuration class [" + configurationClass.getMetadata().getClassName() + "]" , ex); } }); } }
先进入这里 grouping.getImports():
1 2 3 4 5 6 7 public Iterable<Group.Entry> getImports() { for (DeferredImportSelectorHolder deferredImport : this .deferredImports) { this .group.process(deferredImport.getConfigurationClass().getMetadata(), deferredImport.getImportSelector()); } return this .group.selectImports(); }
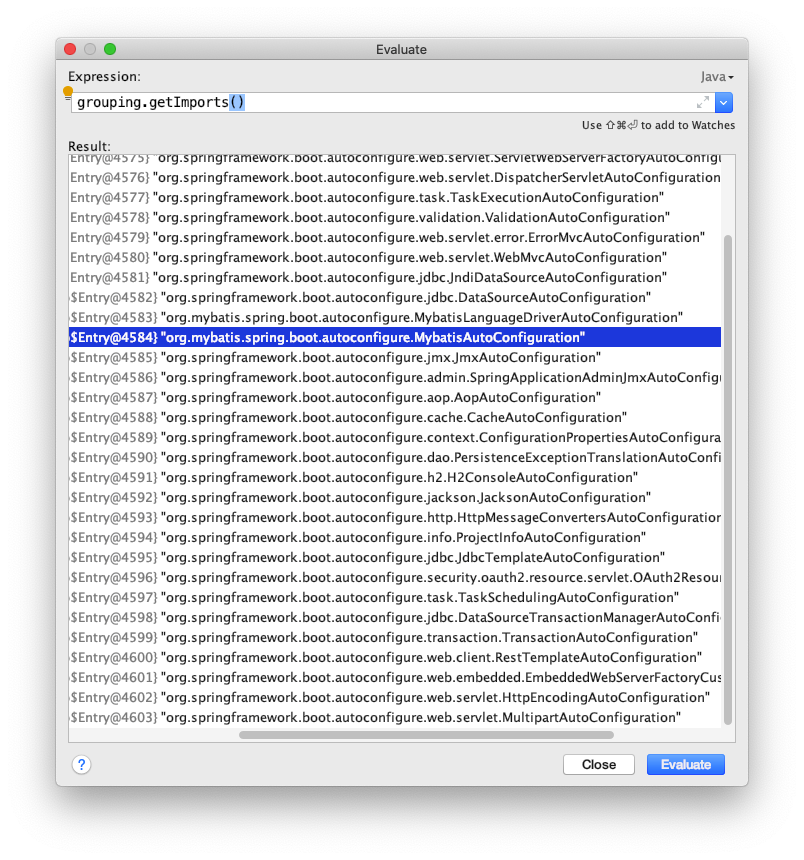
这个过程就是 SpringBoot 提供的,在类路径提供 additional-spring-configuration-metadata.json 提供导入配置的,然而看起来好像所有的 SpringBoot 模块都在这里了,他只是通过导入类路径的包来判断是否要加载配置。 跳过这一段吧,看着有点累。我们现在只要知道,读取了类路径下的 additional-spring-configuration-metadata.json 后,我们想要看到的 MybatisAutoConfiguration 已经被读取到了就好了。
同样的,spring-boot-mybatis-starter 也提供了上面的注册文件:
1 2 3 4 5 6 7 8 9 10 11 12 13 14 15 16 17 18 19 20 21 22 public void processGroupImports () { for (DeferredImportSelectorGrouping grouping : this .groupings.values()) { grouping.getImports().forEach(entry -> { ConfigurationClass configurationClass = this .configurationClasses.get( entry.getMetadata()); try { processImports(configurationClass, asSourceClass(configurationClass), asSourceClasses(entry.getImportClassName()), false ); } catch (BeanDefinitionStoreException ex) { throw ex; } catch (Throwable ex) { throw new BeanDefinitionStoreException ( "Failed to process import candidates for configuration class [" + configurationClass.getMetadata().getClassName() + "]" , ex); } }); } }
那么关于 @Configuration 的解析,在我 之前的文章 就可以看到了。 现在就看看怎么根据主类的所在的包,扫描该包下的所有 Bean。
自动包扫描注册Bean 我们得回到 doProcessConfigurationClass 的这个地方:
1 2 3 4 5 6 7 8 9 10 11 12 13 14 15 16 17 18 19 20 21 22 Set<AnnotationAttributes> componentScans = AnnotationConfigUtils.attributesForRepeatable( sourceClass.getMetadata(), ComponentScans.class, ComponentScan.class); if (!componentScans.isEmpty() && !this .conditionEvaluator.shouldSkip(sourceClass.getMetadata(), ConfigurationPhase.REGISTER_BEAN)) { for (AnnotationAttributes componentScan : componentScans) { Set<BeanDefinitionHolder> scannedBeanDefinitions = this .componentScanParser.parse(componentScan, sourceClass.getMetadata().getClassName()); for (BeanDefinitionHolder holder : scannedBeanDefinitions) { BeanDefinition bdCand = holder.getBeanDefinition().getOriginatingBeanDefinition(); if (bdCand == null ) { bdCand = holder.getBeanDefinition(); } if (ConfigurationClassUtils.checkConfigurationClassCandidate(bdCand, this .metadataReaderFactory)) { parse(bdCand.getBeanClassName(), holder.getBeanName()); } } } }
1 2 3 4 5 6 7 8 9 10 11 12 13 14 15 16 17 18 19 20 21 22 23 24 25 26 27 28 29 30 31 32 33 34 35 36 37 38 39 40 41 42 43 44 45 46 47 48 49 50 51 52 53 54 55 56 57 58 59 60 61 62 public Set<BeanDefinitionHolder> parse (AnnotationAttributes componentScan, final String declaringClass) { ClassPathBeanDefinitionScanner scanner = new ClassPathBeanDefinitionScanner (this .registry, componentScan.getBoolean("useDefaultFilters" ), this .environment, this .resourceLoader); Class<? extends BeanNameGenerator > generatorClass = componentScan.getClass("nameGenerator" ); boolean useInheritedGenerator = (BeanNameGenerator.class == generatorClass); scanner.setBeanNameGenerator(useInheritedGenerator ? this .beanNameGenerator : BeanUtils.instantiateClass(generatorClass)); ScopedProxyMode scopedProxyMode = componentScan.getEnum("scopedProxy" ); if (scopedProxyMode != ScopedProxyMode.DEFAULT) { scanner.setScopedProxyMode(scopedProxyMode); } else { Class<? extends ScopeMetadataResolver > resolverClass = componentScan.getClass("scopeResolver" ); scanner.setScopeMetadataResolver(BeanUtils.instantiateClass(resolverClass)); } scanner.setResourcePattern(componentScan.getString("resourcePattern" )); for (AnnotationAttributes filter : componentScan.getAnnotationArray("includeFilters" )) { for (TypeFilter typeFilter : typeFiltersFor(filter)) { scanner.addIncludeFilter(typeFilter); } } for (AnnotationAttributes filter : componentScan.getAnnotationArray("excludeFilters" )) { for (TypeFilter typeFilter : typeFiltersFor(filter)) { scanner.addExcludeFilter(typeFilter); } } boolean lazyInit = componentScan.getBoolean("lazyInit" ); if (lazyInit) { scanner.getBeanDefinitionDefaults().setLazyInit(true ); } Set<String> basePackages = new LinkedHashSet <>(); String[] basePackagesArray = componentScan.getStringArray("basePackages" ); for (String pkg : basePackagesArray) { String[] tokenized = StringUtils.tokenizeToStringArray(this .environment.resolvePlaceholders(pkg), ConfigurableApplicationContext.CONFIG_LOCATION_DELIMITERS); Collections.addAll(basePackages, tokenized); } for (Class<?> clazz : componentScan.getClassArray("basePackageClasses" )) { basePackages.add(ClassUtils.getPackageName(clazz)); } if (basePackages.isEmpty()) { basePackages.add(ClassUtils.getPackageName(declaringClass)); } scanner.addExcludeFilter(new AbstractTypeHierarchyTraversingFilter (false , false ) { @Override protected boolean matchClassName (String className) { return declaringClass.equals(className); } }); return scanner.doScan(StringUtils.toStringArray(basePackages)); }
真正的扫描,做的事情可谓多得多
1 2 3 4 5 6 7 8 9 10 11 12 13 14 15 16 17 18 19 20 21 22 23 24 25 26 27 28 protected Set<BeanDefinitionHolder> doScan (String... basePackages) { Assert.notEmpty(basePackages, "At least one base package must be specified" ); Set<BeanDefinitionHolder> beanDefinitions = new LinkedHashSet <>(); for (String basePackage : basePackages) { Set<BeanDefinition> candidates = findCandidateComponents(basePackage); for (BeanDefinition candidate : candidates) { ScopeMetadata scopeMetadata = this .scopeMetadataResolver.resolveScopeMetadata(candidate); candidate.setScope(scopeMetadata.getScopeName()); String beanName = this .beanNameGenerator.generateBeanName(candidate, this .registry); if (candidate instanceof AbstractBeanDefinition) { postProcessBeanDefinition((AbstractBeanDefinition) candidate, beanName); } if (candidate instanceof AnnotatedBeanDefinition) { AnnotationConfigUtils.processCommonDefinitionAnnotations((AnnotatedBeanDefinition) candidate); } if (checkCandidate(beanName, candidate)) { BeanDefinitionHolder definitionHolder = new BeanDefinitionHolder (candidate, beanName); definitionHolder = AnnotationConfigUtils.applyScopedProxyMode(scopeMetadata, definitionHolder, this .registry); beanDefinitions.add(definitionHolder); registerBeanDefinition(definitionHolder, this .registry); } } } return beanDefinitions; }
扫描:
1 2 3 4 5 6 7 8 public Set<BeanDefinition> findCandidateComponents (String basePackage) { if (this .componentsIndex != null && indexSupportsIncludeFilters()) { return addCandidateComponentsFromIndex(this .componentsIndex, basePackage); } else { return scanCandidateComponents(basePackage); } }
1 2 3 4 5 6 7 8 9 10 11 12 13 14 15 16 17 18 19 20 21 22 23 24 25 26 27 28 29 30 31 32 33 34 35 36 37 38 39 40 41 42 43 44 45 46 47 48 49 50 51 52 53 54 55 56 57 58 private Set<BeanDefinition> scanCandidateComponents (String basePackage) { Set<BeanDefinition> candidates = new LinkedHashSet <>(); try { String packageSearchPath = ResourcePatternResolver.CLASSPATH_ALL_URL_PREFIX + resolveBasePackage(basePackage) + '/' + this .resourcePattern; Resource[] resources = getResourcePatternResolver().getResources(packageSearchPath); boolean traceEnabled = logger.isTraceEnabled(); boolean debugEnabled = logger.isDebugEnabled(); for (Resource resource : resources) { if (traceEnabled) { logger.trace("Scanning " + resource); } if (resource.isReadable()) { try { MetadataReader metadataReader = getMetadataReaderFactory().getMetadataReader(resource); if (isCandidateComponent(metadataReader)) { ScannedGenericBeanDefinition sbd = new ScannedGenericBeanDefinition (metadataReader); sbd.setResource(resource); sbd.setSource(resource); if (isCandidateComponent(sbd)) { if (debugEnabled) { logger.debug("Identified candidate component class: " + resource); } candidates.add(sbd); } else { if (debugEnabled) { logger.debug("Ignored because not a concrete top-level class: " + resource); } } } else { if (traceEnabled) { logger.trace("Ignored because not matching any filter: " + resource); } } } catch (Throwable ex) { throw new BeanDefinitionStoreException ( "Failed to read candidate component class: " + resource, ex); } } else { if (traceEnabled) { logger.trace("Ignored because not readable: " + resource); } } } } catch (IOException ex) { throw new BeanDefinitionStoreException ("I/O failure during classpath scanning" , ex); } return candidates; }
OK,扫描完成,后在 finishBeanFactoryInitialization 进行初始化就可以了
结束
 好了,接下来回到上面的解析方法: